Take a look at the files stored on your Mac right now. You might have a Documents folder with carefully-organized Word and Pages files. iPhoto could be filled to the brim with images snapped over the years. Or everything could be filling up your desktop.
When was the last time you saved copies of these files? Is there a hard drive sitting on your desk constantly duplicating important documents? Maybe a pile of DVDs labeled by date burned? Or is that picture on your desktop the only copy you have?
Let’s talk backups.
The Summary
If you have any files on your computer that you wouldn’t want to lose, you should have at least one extra copy of those files. That copy needs to be stored somewhere that isn’t your startup disk: an external hard drive, a USB stick, a CD-R, an FTP server, an online backup service. Automated backups are ideal because they require little change in behavior on your part (“set it and forget it”), but whether you go automatic or manual, a backup should be considered as crucial to your computer as the keyboard and mouse.
The Why
Why take such precautions? Simply put:
- Computers aren’t perfect.
- People make mistakes.
Those points are worth going through separately.
Computers Aren’t Perfect
Though the technology of personal computers has come a long way in the past 30+ years, your hard drive (or solid state drive for newer machines) isn’t going to last forever. Eventually, individual sectors on the drive will cease to function, leaving whatever data was on those sectors corrupted and inaccessible. In extreme cases, the drive could catastrophically fail, becoming completely unusable and taking all its stored files along with it. As dependable as computers have become, we can’t simply assume that problems will never come up in the future. A backup is a simple way to ensure you don’t have to worry about hardware problems.
People Make Mistakes
Ever accidentally saved over a text document you had spent hours working on, then had to spend several more hours redoing all that work? Maybe you deleted a photo from iPhoto and emptied the Trash, only to realize that it was the only copy of Baby’s First Steps? Computers are sometimes so easy to use that they dutifully let us destroy our own hard work. A backup protects you and your data from yourself.
The How
How you back up your computer is entirely up to you. Some people prefer to burn DVDs to keep iPhoto archives from specific years or events. Others might manually drag their Documents folders and a few other essentials to a Flash drive they carry around in their pockets. Still others may clone their entire hard drive to create a bootable backup. Any of these satisfy the need of a backup (if it’s important, have two of it) and are therefore perfectly valid. However, since this article is written for people who might have previously not been backing up, I’m going to focus on the easiest Mac solution that’s quickest to get up and running: Time Machine.
Since Mac OS X Leopard in 2007, Apple has bundled the Time Machine software with all Macs. This software, combined with an external hard drive, allows you to automatically back up your entire computer. Every hour, the backup check runs and saves any files you’ve created or modified since the last backup. All this is done in the background, with no extra work required by you beyond the initial setup.
If anything ever happens to your files, you have the ability to quickly and easily recover individual items. If you have a complete system failure, Time Machine allows restoration from a previous backup before the issue occurred. If you lose the entire computer, OS X has the built-in ability to migrate from your Time Machine backup. There are lots of ways to back up, but Time Machine is by far the easiest.
Get a Hard Drive
First thing’s first, you need a place to keep your backups!
The most common question I’ve gotten at this point is in regards to hard drive capacity. Some people check the current size of their files and get a drive around that size, but that may not be sufficiently forward-thinking; as time goes by, you’re going to add more files than you remove, and with the advent of RAW photos and HD videos, file sizes are only going to increase over time. At minimum, your backup drive should be able to hold as much data as your computer can.
Mount all the drives you’d like to back up, check their total capacities ( Apple menu > About This Mac, click Storage), and add them up. Here’s my setup:
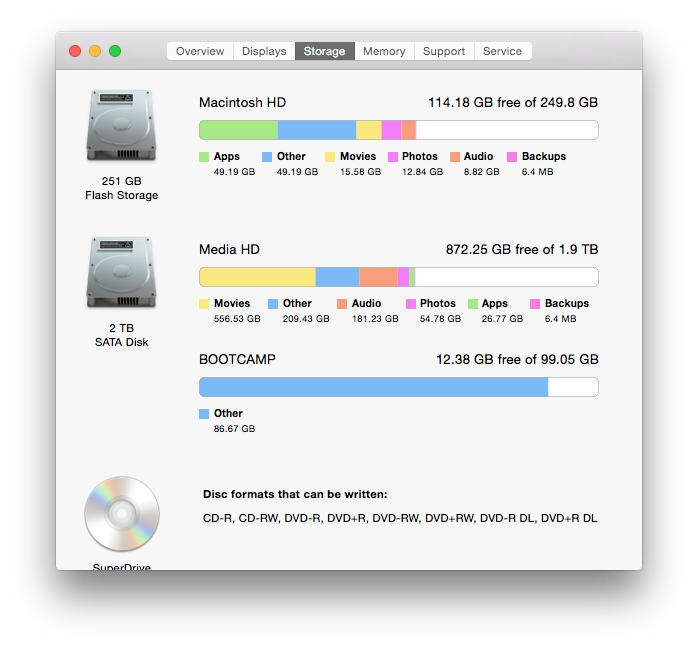
The drive capacities are shown in the left column underneath the drive icons. If my flash drive and my hard drive were both full, I would theoretically need a backup drive with at least 2.25 TB of free space to have a complete backup.
All that said, bigger is better. In addition to a full current backup, Time Machine also holds onto previous backups until its drive is filled. A good rule of thumb is to go up to the next 1 TB level; in my case, I’d probably want at least a 3 TB drive (I ended up going with 4 TB so I’d have a larger archive).
The Apple Store carries a wide variety of hard drives in various capacities (these are also available in the physical Apple Retail Stores). Pick whichever drive in the capacity you want and meets your specific needs (portable vs desktop, durability, manufacturer warranties). I wouldn’t worry too much about connection types; Thunderbolt is crazy-fast and great for storing large media, but backups don’t necessarily need to be quick, so a cheaper USB option will be fine.
To Time Capsule or Not to Time Capsule?
On that Apple Store page, you may have noticed two AirPort Extreme-shaped products. These are the 2 TB and 3 TB versions of Apple’s AirPort Time Capsule. This product allows you to use the Time Machine software to perform over-the-network or wireless backups.
If you have a notebook and are worried you won’t remember to plug in a USB drive all the time, or if you want to back up multiple Macs without purchasing multiple drives, a Time Capsule might be a good solution for you. However, for the multi-Mac backup option, it’s worth noting that even 3 TB may not be sufficient in the future. I’ll leave the buying decision up to you ultimately, but if most of your backups are to a desktop Mac, individual drives that stay plugged in all the time will work just as well, and have the benefit of being easily swappable to larger capacities in the future as needed.
Set up Time Machine
If you haven’t previously used Time Machine, the act of plugging in your drive will probably generate a prompt asking you to turn it on:
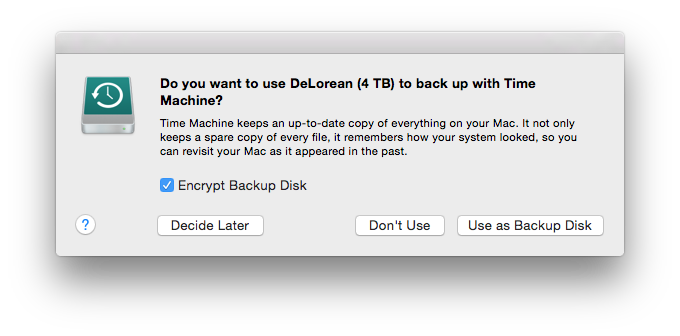
Click Use as Backup Disk, and you’re off to the races! Optionally, if you want to protect the data on the backup drive in the event of someone getting access to the drive, check Encrypt Backup Disk like I have here.
If you don’t see the popup, open > System Preferences and click Time Machine to see the settings window:
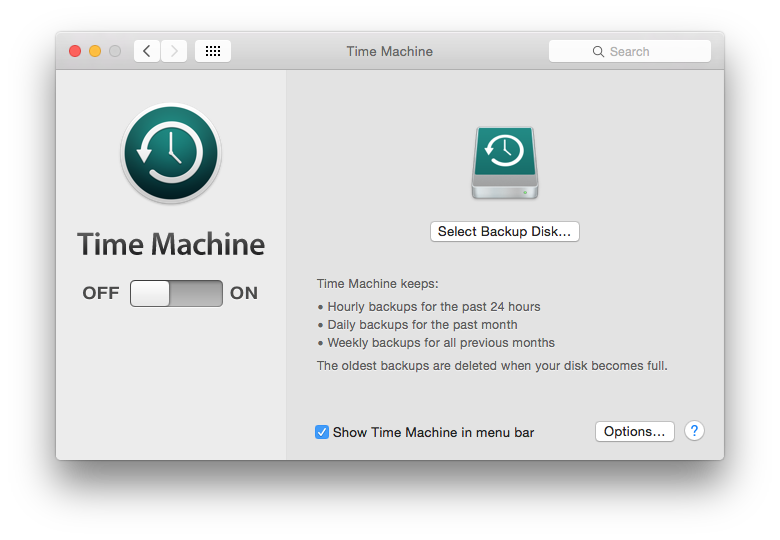
Apple did a great job making this an easy setup. Just an on/off switch and a disk selector! All you need to do is turn on Time Machine and select the drive you’d like to use. Once backups are enabled, you’ll see a window that looks something like this:
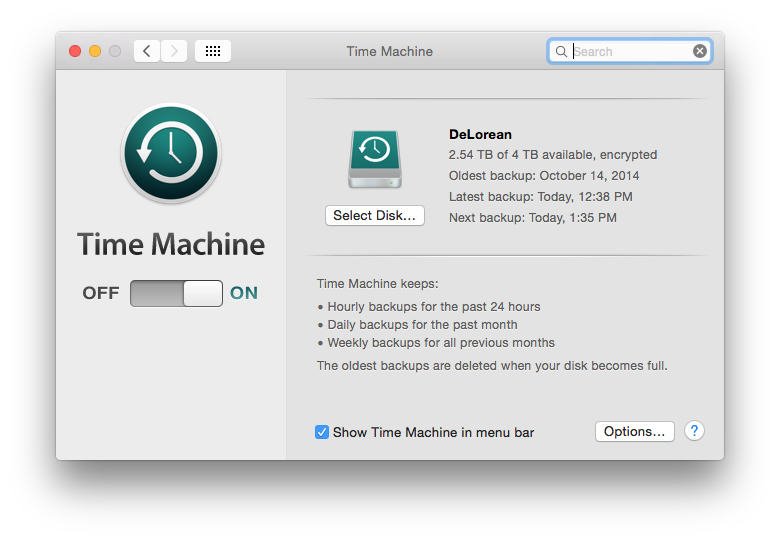
No matter how you enabled Time Machine, the software will immediately start analyzing the data on your Mac and run a complete backup of all files. This backup will run fully in the background; feel free to quit System Preferences and use your computer as normal (be aware that sometimes it will run a bit slower during the first backup). Once the initial backup has completed, you’re good to go!
Going Forward
As long as you leave the hard drive connected (or as long as your computer is on the same network as your Time Capsule), Time Machine will dutifully and regularly back up your Mac’s information. If you hadn’t done so during initial setup, I recommend enabling Show Time Machine in menu bar in the preferences so you can easily see your computer’s backup status; the icon will display an alert if backups haven’t been run in awhile, and clicking it will show you the date and time of the last backup (or current progress if it’s mid-backup).
There is, of course, a lot more you can do to protect yourself from data loss. If one backup is good, two backups are even better. You could set up multiple drives with Time Machine and swap them out periodically, or use alternative applications to clone your system (Carbon Copy Cloner or SuperDuper! are great applications with free or shareware options), or back up to the cloud. I’ve been using Backblaze as my secondary backup and love it; feel free to use my referral link for a free one month trial.
I’ve been in far too many situations where I needed to console someone who had lost irreplaceable data; it’s very difficult to make the case for backups after their files are already gone. It’s best to not let yourself be in that situation in the first place, and a backup is a relatively cheap longterm investment to ensure you never have to put yourself through all that.
If you know someone who isn’t backing up their Mac, please pass this link on to them. If they can’t afford a drive, give them one as a gift and set it up for them. Use Time Machine as a switcher selling point (“If you get a Mac, it can back up all your files for you!”). Make everyone understand the importance of their files so nobody ever has to worry about this problem again.
And go run another backup while you’re thinking about it.
1 comment for “Backups”